
18 Sep Troubleshooting Azure – Resource Quotas
We are currently working on the next internal project, which we will report on in detail in due course. Until then we will blog at irregular intervals about technical stumbling blocks and their solution. Today we start with Azure Resource Quotas. Azure Resource Quotas are certainly not a new topic for many, but there is no clear error message.
Problem
When we wanted to provision the servers in Azure for our internal project, it went smoothly at first. At some point we simply couldn’t select a VM size anymore and therefore couldn’t provision a server anymore. The portal reported “The value must not be empty”, but all VM types were grayed out:


Solution
There are numerous limits to the use of the various Azure services. These are documented here: Azure Subscription Service Limits
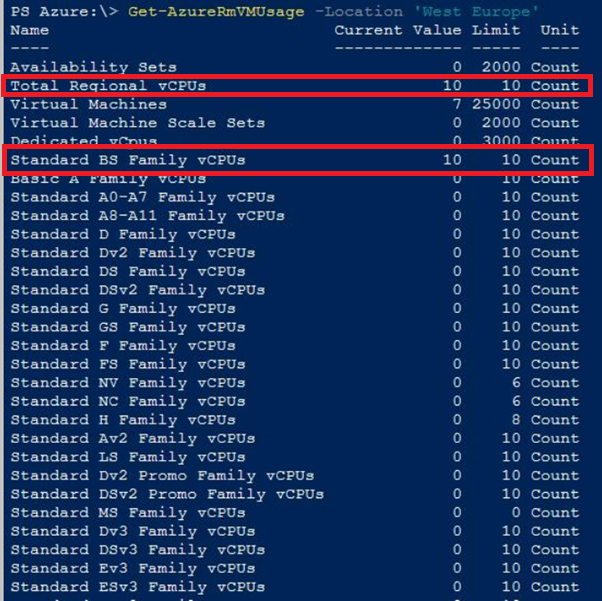
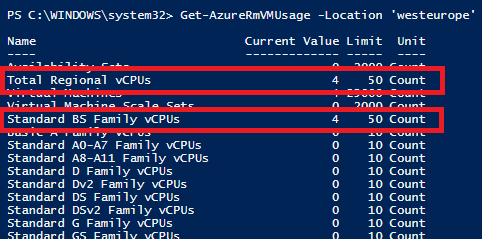
In our case, the vCPU limit for one of the regions and VM size was again exhausted. Probably almost everyone will encounter the problem sooner or later, because the default limits are quite small, as you can see below:
Unfortunately you have to rely on the Azure support for the solution. To change the quotas proceed as follows:
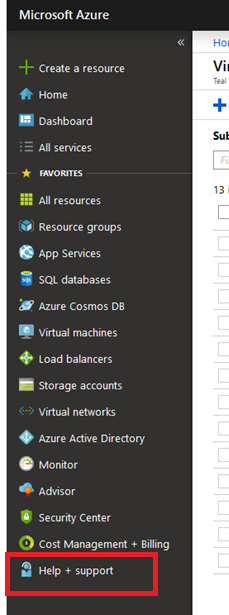
1 In Azure go to Help + Support:
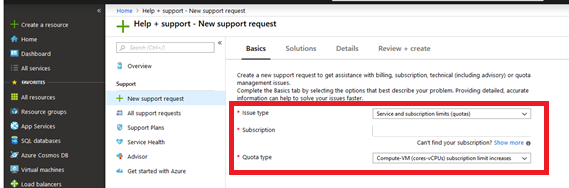
2. create a new support request with the option “New support request” and select the following:
a.Issue Type: Service and subscription limits (quotas)
b.Subscription: (Your subscription)
c.Quota type: Compute VM (core-vCPUs) subscription limit
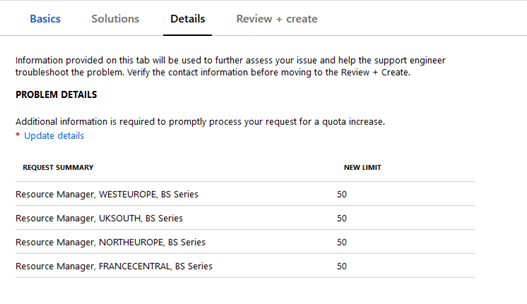
3. In the next step, fill in the appropriate contact details and click on “Provide Details” to add the required details for the quota.

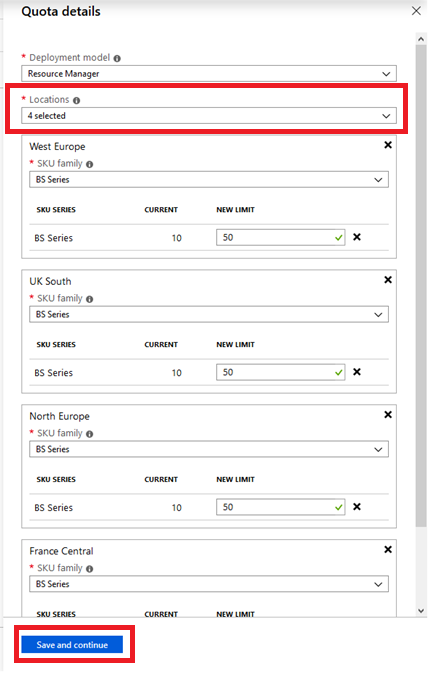
4. In the fly-out menu on the right hand side select the locations in which the quota is to be changed and select the corresponding “family”. Then you can define the new quota. For example 50.
5. supply the support request and wait for implementation. In our case, the implementation took 6 hours.
If you check the quotas again after the implementation, you will see that the “Total Regional vCPU” quota has also been increased:
There is currently no SR to increase the regional quota alone. According to a GitHub issue, this should be changed in early 2019. From there is also the information that the Regional Quota is calculated as follows: “Maximum value of (current regional limit AND Max of (all newly requested SKU limits))”.
Useful links
https://docs.microsoft.com/en-gb/azure/azure-supportability/resource-manager-core-quotas-request
Source: freepik.com
LATEST POSTS
-

(E) SAE DEEP DIVE SERIE Part 2 – Secured VMs in an ESAE environment with VMWare
In our January blog, we started an SAE deep dive series and explained how to use Hyper-V as a secure hypervisor in an (E)SAE scenario. Since by far not all our customers use Hyper-V, but many also use VMWare...
15 June, 2020 -
(E) SAE Deep Dive Series Part 1: Hyper-V Host Guardian Service (HGS) and Shielded VMs in an EASE Environment
After the success of the first ESAE series, we decided to launch a deep dive series in which we go into a little more detail on various measures....
16 January, 2020 -
(E) SAE DEEP DIVE SERIES Part 3 – Separate admin accounts
After Hyper-V HGS and VM protection with VMWare, now the third part of our (E) SAE Deep Dive Series follows. Maybe you follow us on LinkedIn, Xing, Facebook, Instagram or Twitter and ...
15 July, 2020