20 Jun Establish security boundaries in your on-prem AD and Azure environment
Preventing escalation from initial access in your Active Directory (AD) environment to Domain Admins can feel impossible, especially after years of successful red team engagements finding new attack paths each time. While securing your critical assets is challenging, it is not impossible with the right approach.
This blog post provides a high-level explanation of how to implement security boundaries in an on-prem AD and Azure environment to protect your critical assets based on the principle of tiered administration, including how BloodHound Enterprise can help you in the process. Finally, we will cover how to organize your AD objects and Azure resources in a structure that reflects your security boundaries.
The blog post was produced as a collaboration between Teal and SpecterOps.
We recommend that you have a basic understanding of attack paths before reading this blog post, which you can gain from the first section of wald0’s deep dive into the subject: The Attack Path Management Manifesto.
Old and new Microsoft recommendations
Historically, Microsoft recommended using the Enhanced Security Admin Environment (ESAE) architecture to provide a secure environment for AD administrators to prevent full compromise of a production forest in case of compromise of non-admin users. The AD tier model was part of ESAE. Because Microsoft created ESAE before they made Azure, ESAE was explicitly designed for on-prem AD. Thanks to the Internet Archive, you can still read Microsoft’s old version of Securing Privileged Access with EASE, the tier model, etc., here.
On December 15, 2020, Microsoft published their new revised version of Securing Privileged Access on Microsoft docs, including the Enterprise Access Model, which encompasses both on-prem, Operational Technology (OT), Azure, and other cloud providers. Microsoft retied ESAE and took down their old recommendations.
The principles for Microsoft’s old and new recommendations are effectively the same. They recommend tiered administration with dedicated admin accounts. Admins should use a hardened Privileged Access Workstation (PAW) when performing administrative tasks, and the admin session must require Multi-Factor Authentication (MFA) and Just-In-Time (JIT) restrictions. Deployment of PAWs and other critical assets must comply with the clean source principle.
The main difference between the two sets of recommendations is the focus on Azure. The previous recommendations had a strong focus on preventing cached credentials, an extensive security challenge in on-prem environments. Microsoft’s latest recommendations include Azure technologies like Conditional Access, which is highly relevant for Azure as the control panels are Internet exposed.
As the core fundamentals of each are the same (limiting access to privilege, we recommend using elements from ESAE as the underlying basis for creating security boundaries in on-prem AD and use Microsoft’s latest recommendations for Azure.
In the following sub-sections, we will dive into the tier model from ESAE and the equivalent Enterprise Access Model from the latest Securing Privileged Access.
Active Directory administrative tier model
The purpose of the tier model is to implement security boundaries that will protect critical assets from high-risk devices like regular workstations adversaries frequently compromise.
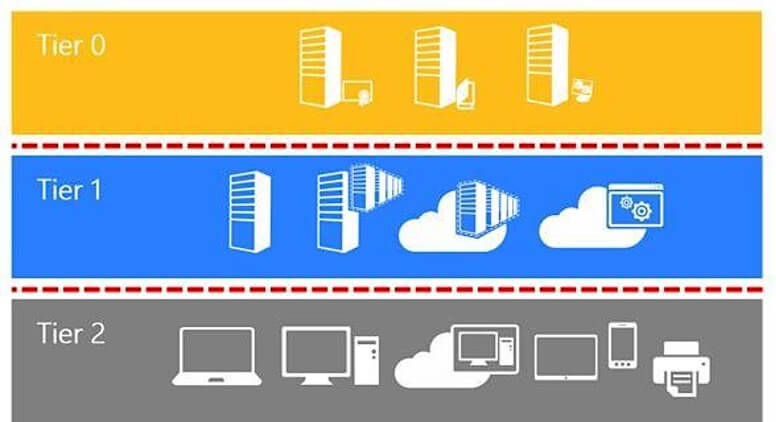
-
- Tier Zero: Critical assets with direct or indirect control over the entire AD forest. Members of Enterprise Admins have direct control, whereas a SCOM admin account has indirect control if DCs have SCOM agents installed.
- Tier One: Enterprise servers and applications. These systems do not have direct or indirect control of the environment.
- Tier Two: Workstations and other devices.
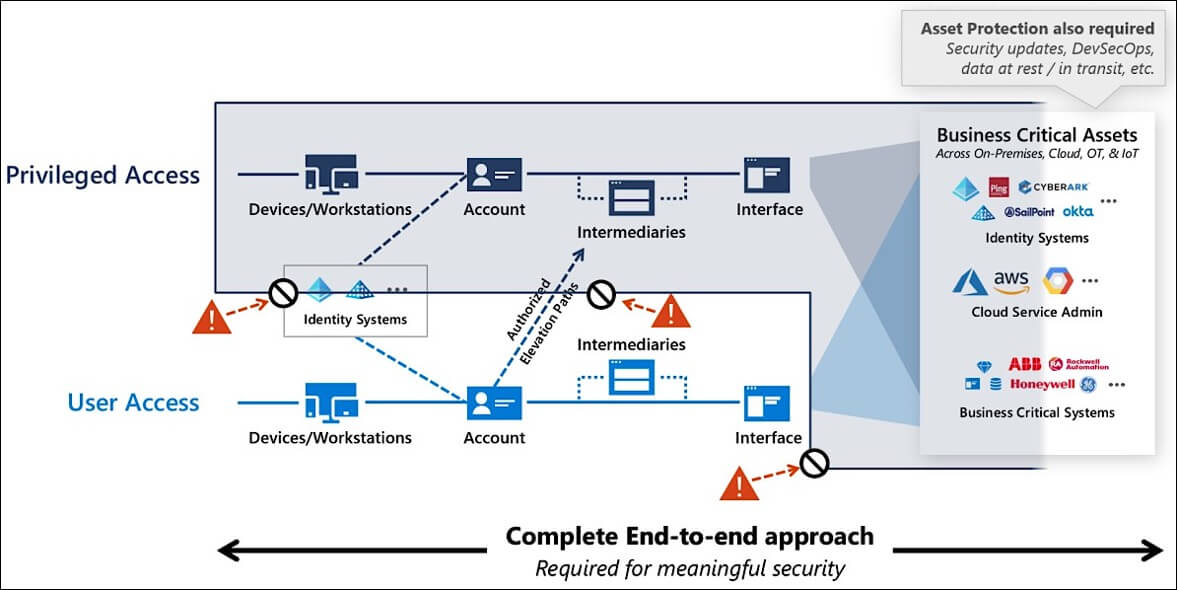
Assets of a higher tier (closer to zero) can control assets in a lower tier, but not the other way around. For example, Domain Admins in Tier Zero can have the privilege to reset the password of any user account. In contrast, tiering allows the help desk to reset the password of Tier Two users only and not the server admins in Tier One and Zero.
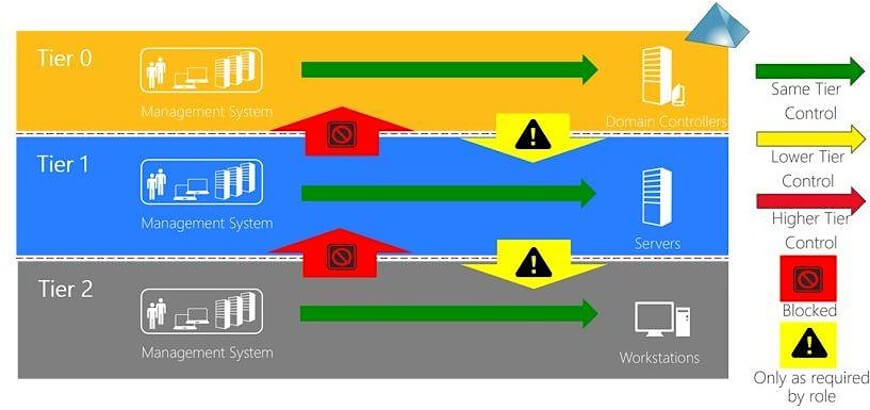
The second principle of the tier model restricts users’ login rights such that user accounts are only allowed to login into a single tier. Naturally, Tier Two users cannot log in on critical servers in Tier Zero. Less intuitively, Domain Admins cannot log in on Tier One and Tier Two computers, despite full control over them. This restriction is because user credentials are (in most cases) cached on the computer where the user logs in. A malicious user with administrative rights on that computer can steal these credentials, e.g., using Mimikatz, and impersonate the victim user to log in on other systems where the victim user has access.

The consequence of this principle is that employees with Tier Zero access must have a dedicated Tier Zero user and a separate Tier Two account they can use for their regular Tier Two workstation for emailing, web browsing, etc. The principle does not apply only to human user accounts but to any accounts, including service accounts.
The yellow arrows in the illustration above indicate that users from a lower tier can log in on systems in higher tiers, but only as required. For example, if you have a file server in Tier 1 that Tier Two users use, the users must have network logon privilege on this server. Still, Tier Two users cannot perform an interactive login on the computer through RDP or any other network protocol, nor have administrative rights on the computer, as that would violate the tiering.
As a consequence of the clean source principle, admins with privileged access to a given tier must establish the privileged session from a workstation belonging to the same tier. PAWs are therefore required, and admins cannot use their regular Tier Two workstations for managing Tier One and Zero.
Enterprise Access Model
The Enterprise Access Model is the replacement for the tier model in Microsoft’s latest recommendations:
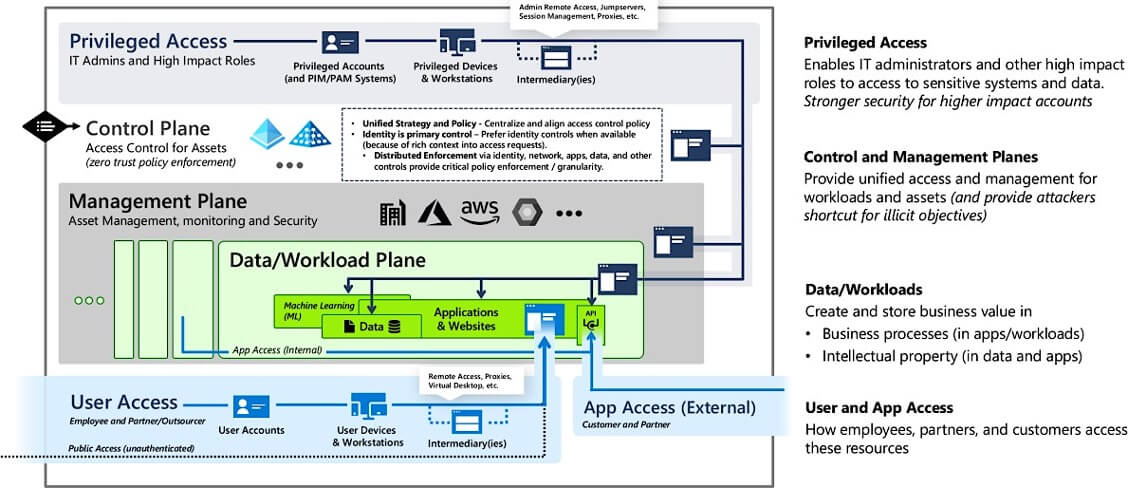
The concept is very similar to AD tiering. The Control Plane is the equivalent of Tier Zero, whereas the Management Plane and the Data/Workload Plane are Tier One. Access to the planes in Tier One and Tier Zero should happen from Privileged Devices and Workstations (aka PAWs), separate from regular User Access and App Access from devices in Tier Two.
Privileged access should be completely isolated from user access, as illustrated in Microsoft’s Privileged Access Strategy:
How to create security boundaries
How do we change your environments to comply with the concept of tiered administration? And very importantly, how do we do it effectively and securely? This section will cover the overall phases of implementing security boundaries in on-prem AD and Azure. We will use the tiering terminology for both on-prem AD and Azure.
Classify your systems
It is essential first to decide your security boundary, i.e., which tier your assets belong to, and which employees should have access to what assets. You cannot protect your critical assets from non-privileged users if you do not know your critical assets and which users you will allow access to.
We recommend starting by implementing a single security boundary to isolate your Tier Zero from the rest of your environment, as Tier Zero gives full control over everything.
Identify potential attack paths and set prioritization
Identify possible attack paths crossing your security boundaries and set prioritization based on how critical the attack path is for the environment.
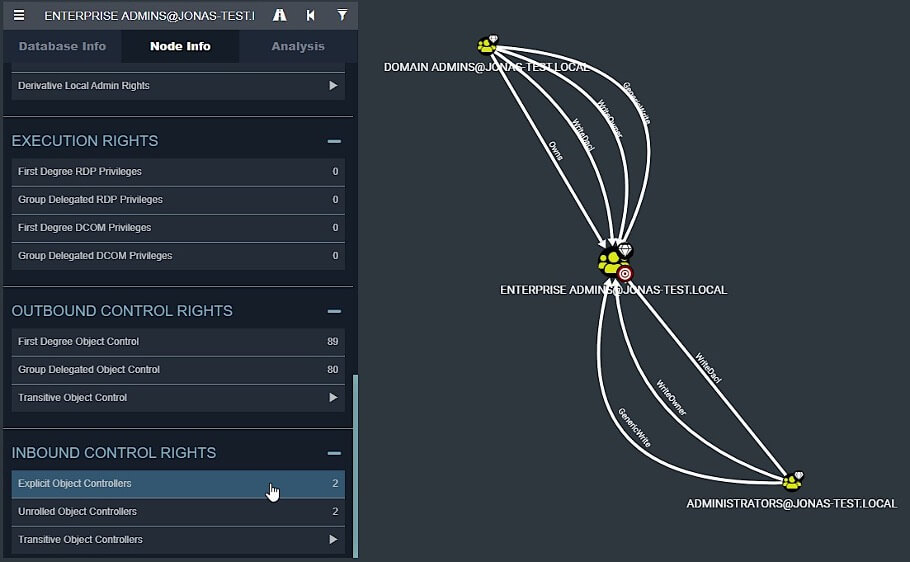
You can use the FOSS (Free and Open-Source Software) version of BloodHound to identify critical attack paths using analysis functions like “Shortest Paths from Domain Users to High Value Targets”. BloodHound also enables you to enumerate the inbound control of your Tier Zero assets:
You should aim to find all compromising permissions on Tier Zero assets granted to Non Tier Zero objects and prioritize those. FOSS BloodHound does not provide a severity score for attack paths, but you can prioritize the attack paths manually. An attack path exposed to very few users in the environment is not as urgent to remediate as attack paths that all users can exploit, e.g., if the Domain Users group has compromising permissions.
BloodHound Enterprise (BHE) can help you speed up that process. BHE maps all the attack paths from the entire AD domain or Azure tenant towards Tier Zero. It measures the exposure of each attack path, i.e., the percentage of users with the necessary rights to abuse it. In the example below, a Tier Zero AD user (ADMINISTRATOR@TESTLAB.LOCAL) has a session on a Non Tier Zero computer (WIN10.TESTLAB.LOCAL), which leaves the credentials of the Tier Zero user exposed to Non Tier Zero users with execution access to this Non Tier Zero computer:
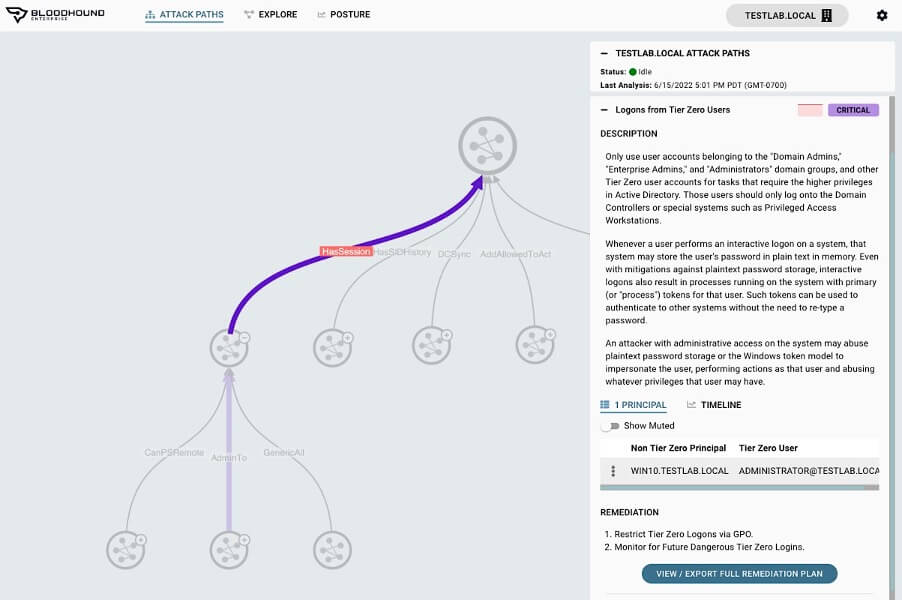
It may not seem like a significant problem as it only evolves a single Tier Zero user, but it is a critical finding according to BHE, and if we check the timeline, we can see that the exposure is 100%:
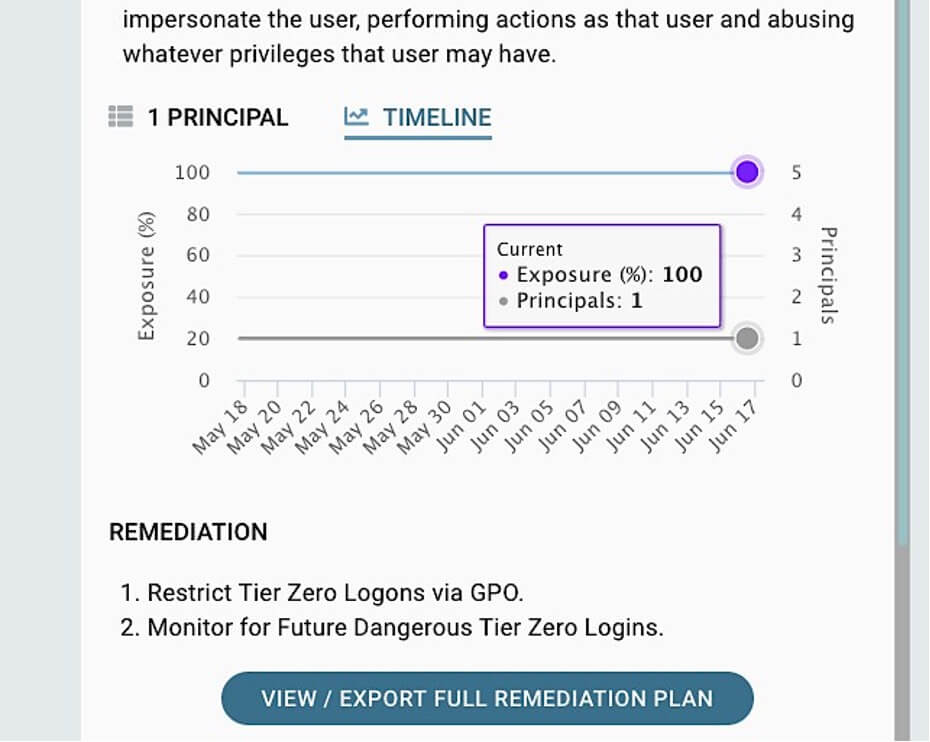
The 100% exposure means that 100% of the users and computers in the domain have the ability to abuse an attack path and gain access to the Non Tier Zero computer. BHE can, in this way, help you identify attack paths to Tier Zero and give you a criticality based on the exposure.
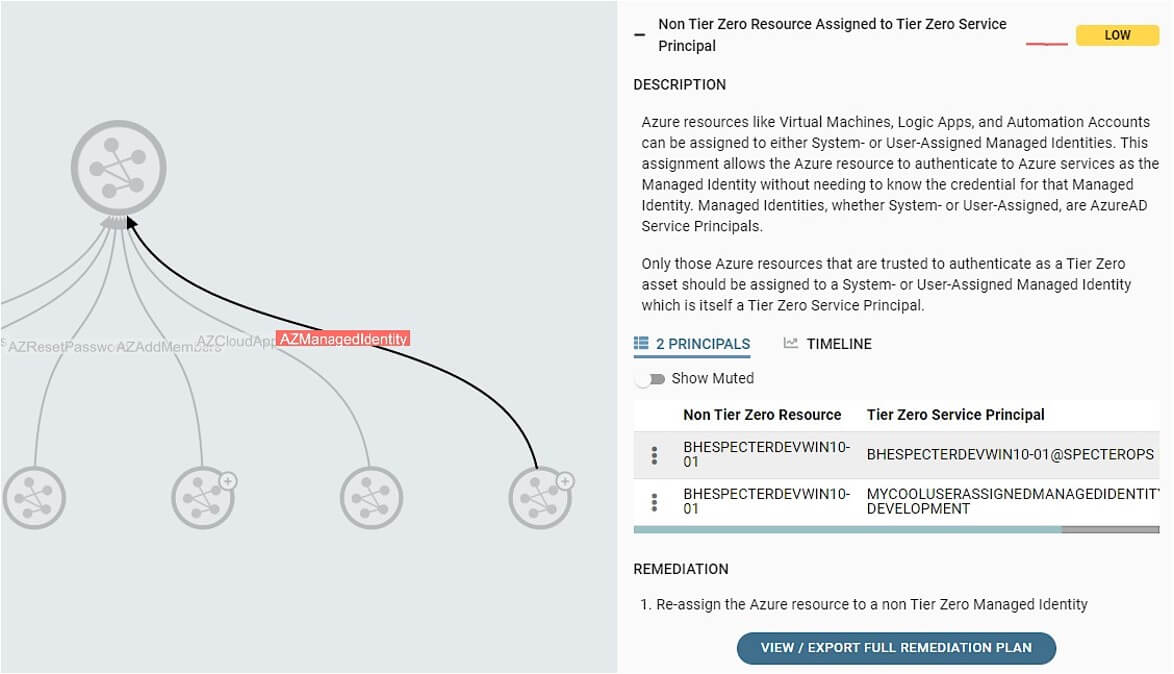
Azure support was recently added to BHE, and BHE is now likewise able to map out attack paths in Azure:
Create a roadmap and implement
Critical attack paths should have high priority, and some are low-hanging fruits that can be remediated immediately with almost no risk of undesired side effects. For example, you can quickly correct if a Tier Zero object owner is not a Tier Zero object by changing the owner to, e.g., Domain Admins.
Other attack paths are not effectively remediated with a one-by-one approach and require more planning—for example, a Tier Zero admin user logging in on a Tier One server. It may only involve a single user this time, but you must ensure all users have the proper accounts, have the correct login permissions, and know what user account to use for which systems. Else, it will happen again and again.
Therefore, it is essential to create a plan (roadmap) for how and in which order you will remediate and enforce your security boundary to solve the issues effectively and reduce the risk of causing production systems to fail.
It is excellent if you can execute tasks in parallel but remember that both systems and humans cannot deal with too much simultaneously. Implementing multiple things simultaneously in the same system increases the risk of systems failing and making it harder to debug. On the human side, you do not what to overload the IT personnel with tasks as they are critical for success.
It is best to plan and schedule remediations in the order that makes sense with an understanding of all Attack Paths. For example, forcing admins to use physical Tier Zero PAWs will have little to zero impact if your environment contains attack paths from Domain Users to Tier Zero. Such attack paths will bypass the protection provided by PAWs completely.
Unforeseen challenges and blockers occur, and new critical vulnerabilities are constantly published. Therefore, you must frequently evaluate and update the roadmap and prioritization.
The following sections describe an example of a generic high-level roadmap for isolating Tier Zero with a security boundary.
-
-
- Remediate easy-to-fix Tier Zero attack paths
- Assess security principals with control on Tier Zero systems
- Assess on-prem AD login consequences
- Design tiering structure and build it
- Ensure correct on-prem login permissions
- Move AD objects and Azure resources
- Remediate remaining Tier Zero attack paths
- Implement Privileged Access Workstation (PAW)
- Implement Just-In-Time (JIT) administration
-
1) Remediate easy-to-fix Tier Zero attack paths
Go through the identified Tier Zero attack path and judge if this is something that can be solved permanently with a quick fix and little to no risk of systems failing. Remediate those attack paths.
BHE provides a recommended remediation guide for every attack path:
2) Assess security principals with control on Tier Zero systems
Assuming you have defined what systems belong to Tier Zero, go through the list of security principals that have inbound control on each Tier Zero system and decide whether they need this access and belong to Tier Zero. FOSS BloodHound and BHE can provide you with the list, or you could manually iterate RBAC roles, ACLs, local groups, etc. Remember to assess those you add as well. Afterward, you should have a complete list of Tier Zero assets, including systems, users, groups, etc.
3) Assess on-prem AD login consequencesn
All Tier Zero users in on-prem AD, including service accounts, are not allowed to log in on Non Tier Zero computers. Identify where extra Non Tier Zero accounts are necessary. Human users are easy because humans can manage multiple accounts, but service accounts are tricky. A service account for a given system commonly requires login rights on many computers in each tier. You should reconfigure these systems to use at least one service account per tier. If that is not an option, you should deploy separate system instances per tier.
4) Design tiering structure and build it
It is beneficial for the IT security department and the IT administrators to create a structure in your environment that makes it easy to see your security boundary. Clear security boundaries make it easier for admins to know if a given change breaks the security boundary without consulting the security department. It will also solve, or make it easier to solve, attack paths systematically in an effective way.
On-prem AD tiering structure
In on-prem AD, you want an OU structure that reflects your tiers. This is a simple example of what it could look like:
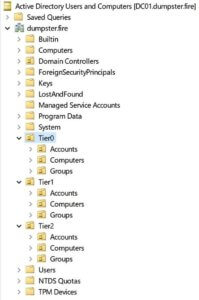
The location of an AD object will make it clear which tier they belong to. Under the Accounts, Computers, and Groups OUs, you could create the OU structure representing departments of the organization or whatever makes sense in your organization. It could also be the other way around, like this:
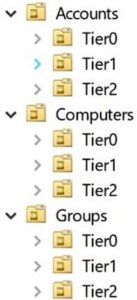
You need to be aware that the parent container must be of the same tier level or higher. Full control on a parent container allows adversaries to create an ACE on the parent, granting full control to child objects. It means full control on a parent container is implicit full control of its child objects (unless inheritance is disabled on child objects). For example, the Accounts, Computers, and Groups OUs in the screenshot above are all Tier Zero OUs because they contain Tier Zero objects.
Azure tiering structure
Guidance and best practices for Azure are well described in Microsoft’s Cloud Adoption Framework, which is an excellent resource for how to build your Azure environment. One of the key concepts is Azure landing zones, a scalable and modular way to manage Azure resources under subscriptions. The chart below is a Microsoft example of an organization with multiple landing zones:

Like on-prem, you want to organize your Azure resources such that it is clear to see the security boundaries. By arranging your Tier Zero resources under one or more Azure landing zones, you can achieve that. You could also use the management- or resource group level to divide your resources into tiers if that suits your environment better. Still, it is essential to remember that the parent (group/subscription) to the highest tier (closest to zero) of its child resources, e.g., parents of Tier Zero resources, are automatically also in Tier Zero.
5) Ensure correct on-prem login permissions
Before moving the AD objects into the new OU structure, we should ensure that the user accounts can log in in the right places and cannot log in elsewhere. A simple solution is to collect all user accounts of each tier into a group and use GPOs linked to the tier OUs to deny login for users belonging to other tiers:

By using the deny rules, we do not have to worry about membership in local groups that give login rights, as the deny rules will take precedence over allow. Sometimes we cannot use deny rules, though. For example, we do not deny network logon for Tier Two users in the above example since Tier Two users need to be able to authenticate against network services hosted in Tier One. Therefore, we need to ensure Tier Two users are not members of Administrators and other privileged groups on Tier One computers.
6) Move AD objects and Azure resources
Now that you have your new tiering structure, it is time to move AD objects and Azure resources into it. The move does not have to be an actual move of the AD object or Azure resource but could also be the creation of a new replacing instance.
Moving AD objects
There are several things you need to consider before you move an AD object to avoid breaking stuff:
-
- Inherited permissions: When you create an Access Control Entity (ACE) in an AD object’s Access Control List (ACL), child objects can be set to inherit the ACE. Unless inheritance is disabled on child objects, child objects will inherit ACEs from their parent containers. As a result, permissions on an AD object may change when you move the AD object, which introduces a risk of failing systems. To prevent surprises, you should compare the inherited ACEs of the AD object’s current parent container and the new parent and determine if you need to add any permissions to the new parent or the AD object itself. Reading ACLs in AD is not easy. This PowerShell script can help you: Get-ADObjectACL.ps1. Suppose you doubt how a given ACE is utilized, e.g., if the permission is set too wide like Full Control granted to Domain Users, you can audit access to the AD object by modifying the AD object’s System Access Control List (SACL). That will enable you to monitor which identities access this object and which action they perform before deciding what ACEs are sufficient on the AD object. For more information, check the “Method Two: Granted vs Requested Permissions” slides (starting at slide 43) from wald0’s presentation on the subject here.
- GPOs and settings: Moving a user or computer object may result in a change of GPOs applied. In the example below, we want to move our ADCS server from the Servers\ADCS OU to Tier0\Computers\ADCS OU. That move will unlink the “Server Settings” GPO from the server and link the GPO “Tier0 Computer Config” instead.
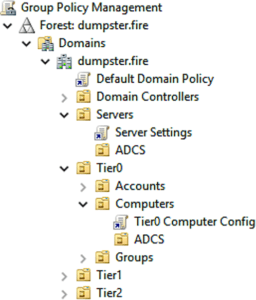
Be aware that it can be hard in a real environment to tell what settings apply to a computer or user using Group Policy Management since GPOs linked closer to an object will overwrite settings set further away, but that is not necessarily true if a GPO is enforced, or loopback processing is enabled. You must also ensure a WMI filter is not filtering out the user or computer.
Policy Analyzer is a great free tool for comparing sets of GPOs setting for setting. It also allows you to compare the current settings locally of a computer with a set of GPOs, which is very useful since other means than GPOs, e.g., SCCM settings or manual configurations, may apply on the computer. If “Process even if the Group Policy objects have not changed” has not been enabled on a computer, GPO settings take effect only once, and admins could have overwritten the settings afterward. Finally, when you unlink a GPO from a computer, the GPO settings will no longer apply, but that is not always the case as some settings persist. Therefore, it is highly recommended to carefully analyze the current local settings on a computer versus the settings that will hit the computer when moved to avoid unknowingly overwriting essential settings.
-
- Hardcoded Distinguished Names (OU paths): Scripts, tools, and manual procedures are sometimes configured to look for AD objects under a given OU and may break or stop working if AD objects are moved outside that OU. There is no easy way to discover hardcoded Distinguished Names, and the best you can do is to make sure to question the right people regarding potential issues before an AD object is moved.
Moving Azure resources
Like on-prem AD, there is a lot to consider when moving Azure resources. For example, an Azure resource’s ID will change after a move, which can cause the same issues as hardcoded Distinguished Names for on-prem AD.
We highly recommend you to read Microsoft’s guide on how to move Azure resources available here. It includes links to guides on moving specific resource types and which types you cannot move.
7) Remediate remaining Tier Zero attack paths
You should already have remediated most of your Tier Zero attack paths by remediating the easy-to-fix and implementing a structure that reflects your security boundary. If there are any Tier Zero attack paths left, you should remediate those now.
8) Implement Privileged Access Workstation (PAW)
PAW is a big subject, and we will not cover PAW in detail in this blog post. Teal has a blog post on PAW available here. Another great resource is Microsoft’s Privileged access devices.
However, there are two essential things regarding PAW we want to make clear:
1. Using PAWs is not enough
After you have deployed PAWs and they are working, you should isolate admin access to the tier the PAW belongs to, so only PAWs can establish admin access to that tier. This ensures adversaries with admin credentials cannot compromise the tier without a PAW under their control.
2. PIM/PAM is not PAW
A Privileged Identity Management / Privileged Access Management (PIM/PAM) solution is great for security but cannot replace a PAW. Suppose you use your regular Tier Two laptop to access Tier One or Zero through a PAM. In that case, it is possible with administrative access to your Tier Two computer to steal or overtake your session to Tier Zero.
9) Implement Just-In-Time (JIT) administration
There are many custom and non-native JIT solutions for both on-prem AD and Azure, which we will not cover in this blog post. LAPS can help you accomplish JIT administration in on-prem AD, but most PIM/PAM solutions provide better options. In Azure, you can configure JIT in Azure AD PIM, which comes with an Azure AD Premium P2 license.
Measuring progress
You can measure the progress of your implementation in many ways, depending on the perspective. If you have divided your roadmap into a list of tasks, you could use the number of tasks completed over the total number of tasks as a measure. That gives an idea of how far you are in your roadmap. To measure your security boundary’s effectiveness, you could count the number of attack paths crossing the security boundary and give them a weight based on criticality.
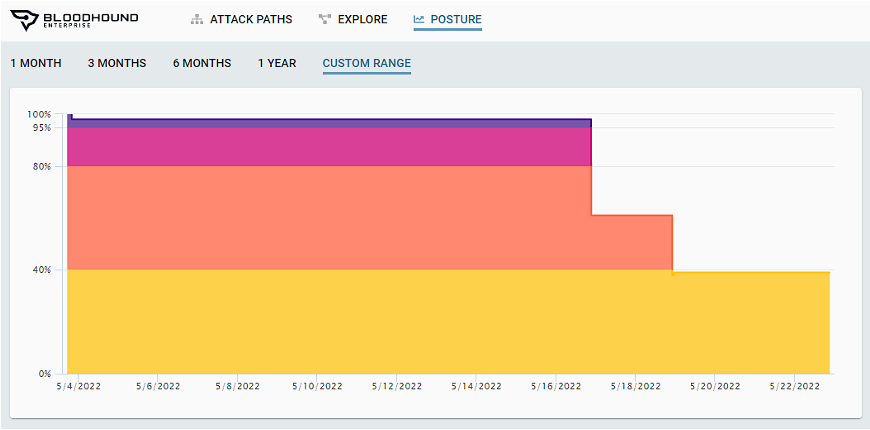
BHE collects data continuously and measures the impact of your remediations of attack paths on BHE’s posture page. The overall exposure of Tier Zero measured over time:
Maintain
When you have established a security boundary (partially or entirely), it is crucial to ensure the security boundary does not vanish over time.
One way to do it is to configure detections based on changes to Tier Zero assets. As an example, this article explains how to detect users added to Domain Admins. Another solution could be to create a script that compares ACEs, group memberships, and RBAC roles of Tier Zero with a blueprint and reports any new entity that breaks the tiering based on the location of the security principal granted the permission.
BHE can also help you with maintenance. You can see in BHE that if a system administrator has made a misconfiguration that breaks your security boundary, new attack paths in BHE will occur, and the exposure will increase. BHE is constantly expanded with new attack path types as researchers and the community publish them, and it will help you stay up to date with new attack types.
Wrap Up
It is not easy to implement security boundaries, but it is doable. Breaking down the great concepts into simple tasks is key to success. Even if you can only partially implement a single security boundary, your critical assets will still be significantly better protected than those of organizations that have not even tried. The further you get, the better are your chances of preventing the adversary from gaining access to your critical assets.
If you want to know more on the subject, check out these links:
You are currently viewing a placeholder content from Default. To access the actual content, click the button below. Please note that doing so will share data with third-party providers.
You are currently viewing a placeholder content from Default. To access the actual content, click the button below. Please note that doing so will share data with third-party providers.
You are currently viewing a placeholder content from Default. To access the actual content, click the button below. Please note that doing so will share data with third-party providers.
You are currently viewing a placeholder content from Default. To access the actual content, click the button below. Please note that doing so will share data with third-party providers.
Sieh dir diesen Beitrag auf Instagram an
Sieh dir diesen Beitrag auf Instagram an
LATEST POSTS
-

Emergency Access in Microsoft Entra: Best Practices for Your Break-Glass Accounts
The so-called “break-glass” accounts. In this article, we'll show you how to securely set up, harden, and monitor this last line of defense in Microsoft Entra according to current best practices....
01 June, 2026 -
Configuration Vulnerability? Why Your Windows Hardening Will Be Outdated in March 2026
With the March 2026 update, the rules for Windows 11 and Windows Server have changed. It is essential that you familiarize yourself with these changes and adjust your hardening configuration....
03 May, 2026 -
BSI Update: Grundschutz++ Will Become Mandatory in 2028 – Why You Should Take Action Now
The wait is over: The BSI has published the first guidelines for Grundschutz++. What at first glance looks like additional bureaucratic red tape is, in fact, the new “state of the art” for NIS2. ...
29 April, 2026